We are familiar with HDMI cables. Mostly we do point-to-point connections to connect a desktop computer to a gaming display, or a Blu-ray player to a TV. This is pure HDMI transmission from one HDMI port to another via an HDMI cable.
What if you want to connect a source device to more than one display? Or maybe you wanna connect the desktop computer and the Blu-ray player to both displays all at once. And you can have these monitors play whatever you need — YouTube videos from the computer, or movies on the Blu-ray player.
In this case, the setup shall be able to serve both as a signal splitter and switcher. And this is not possible by using raw HDMI cables.
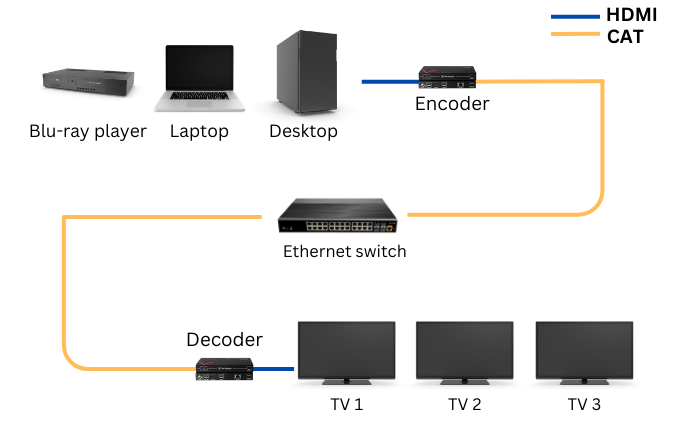
Instead of transmitting HDMI signals all via an HDMI cable, HDMI over IP is a solution to encode HDMI signals into IP data, send it from one end to another (through an Ethernet switch), and decode the IP data back to HDMI to feed your displays.
The HDMI over IP solution is more flexible, scalable, and capable of dealing with much longer distances than an HDMI cable.
Copyright TechPlanet.today

The key contributor in this setup is the HDMI over IP encoder and decoder, which is also known as the transmitter and receiver. The encoder converts HDMI signals from the source device into IP data and transmits the data via a CAT cable for a longer distance (up to 120m) in a more efficient way; as the signals get near the destination, the decoder helps convert the IP data back to HDMI signals and feed them to the TV.
As the encoders and decoders add up, the setup can easily be scaled up to integrate a hundred devices and displays. AV Access is proud of its AV over IP matrix solutions, for example, the HDIP100 series for HD images and the 4KIP200 series for 4K images, which are plug-and-play and support zero-configuration setup with a managed or an unmanaged Ethernet switch.
You might be curious about the Ethernet switch — what does it do? Thanks to the Ethernet switch, data from any one of the source devices can be freely doubled up to 2 screens, or tripled up to 3 screens, and so on and so forth; as all the data is well managed by the switch, you can also switch to any sources that are connected in the setup as well.
If you are looking for an Ethernet switch for this kind of setup, take a good look at the capacity. An Ethernet switch that has enough bandwidth to run your streams is important unless you are cool with screen flickering and latency.
Content distribution control for an HDMI over IP setup is always realized by an App (like VDirector) or a web interface. Having an intuitive control panel can save you days if you are running a video system of considerable size.
VDirector is an app to control video systems built with AV Access’s 4KIP100 & HDIP100. These features make the system friendly to all:
- Distribute your content by pure dragging
- Set up groups for quick control
- Save presets of the current distribution
- Build a video wall
- Control TV volume & power on the app
Everything may still be too abstract to understand. Let’s take a step further and see how a real setup is made — including the use scenario, the product you’ll be using, and how they’re set step by step.

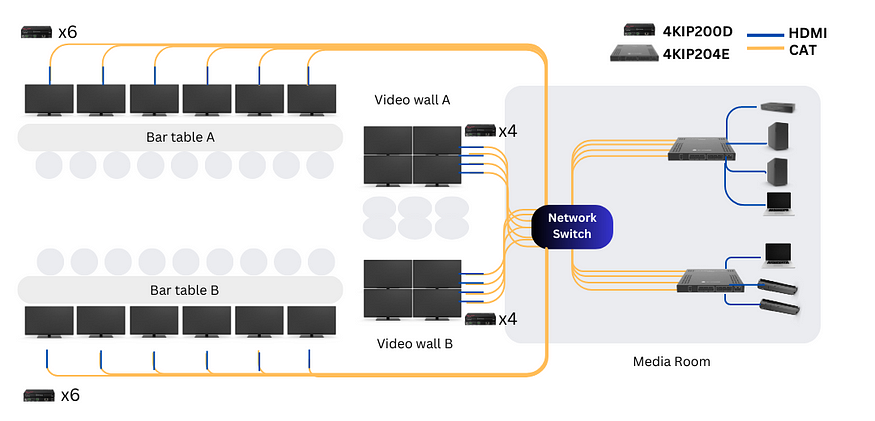
The first use scenario that pops into my mind is a sports bar. In fact, you can use it in whatever bars or restaurants. While let’s assume you’re running a sports bar. In order to stream a good number of games and ensure that every customer can watch something comfortably from their seats, you need 20 displays or TVs. In the meantime, you need some source devices to feed on these displays too — for example, 2 desktops, 2 laptops, 2 TV sticks/boxes, and a Blu-ray player.
With these devices and displays, you’ll be able to stream 7 different games for 20 groups of people.

In this case, you need 2 4KIP204E (4-in-1 transmitter) as the encoders and 20 4KIP200D as the decoders and have them connected to the TVs, source devices, and the network switch via HDMI cables and CAT cables (CAT5e and above).
Steps of setting it up:
- Source devices to the encoders via HDMI cables
- Encoders to the network switch via CAT cables
- Network switch to the decoders via CAT cables
- Decoders to the TVs via HDMI cables
If you find this confusing, I hope this video of the setup guide would help clarify everything, including the setup of video walls.
With this HDMI over IP matrix well set, you will be able to freely switch and play video from the sources on all TVs and easily control your feeds with the VDirector app on a tablet like an iPad, or your laptop/cellphone.
The key benefits of having an HDMI over IP, or AV over IP matrix are to simplify the whole setup and still enjoy powerful matrix switching functions; to own a video system that is open for changes (scalable and flexible), and to build video walls as you like.
It’s critical to take more effort into the setup stage and a good video system will save you a lot of trouble in the future. If you have any problems with our AV over IP solutions, please feel free to contact us at info@avaccess.com.
Source: https://www.avaccess.com/blogs/guides/what-is-hdmi-over-ip-setup/
In case you have found a mistake in the text, please send a message to the author by selecting the mistake and pressing Ctrl-Enter.
#HDMI #Connecting #Source #Devices #Displays


